Rateshopping is the process of comparing (or "shopping") rates multiple carriers/services at once, allowing you to quickly decide on what options to use for a given shipment.
Rateshops are a standard component of ShipStore, and available to all customers. The below article will detail the process of creating/configuring rateshops in the system, as well as how to use the rateshops in the system once they are configured.
Creating/modifying a rateshop
Rateshops are created and modified from the Administration page in the system, under the Profiles section, Service Setup tab.
To add a rateshop:
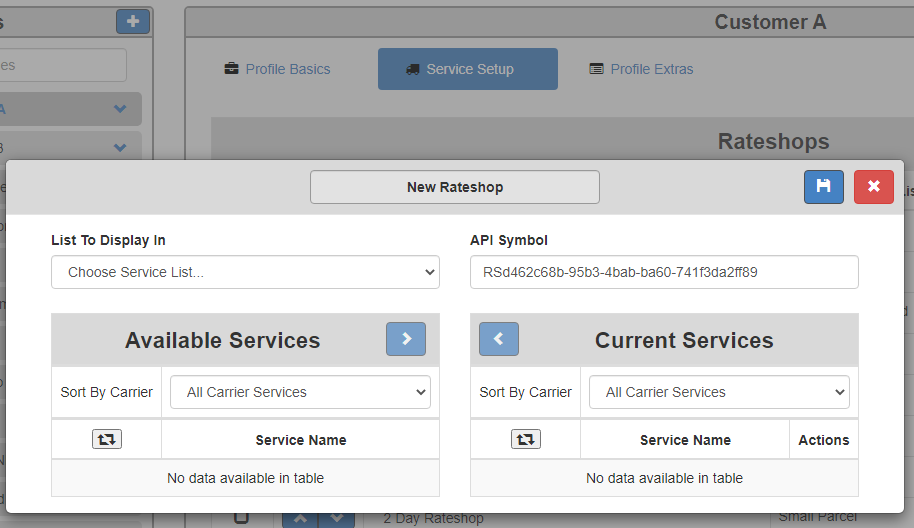
- On the Rateshops window, click the “+”. This will bring up a pop-up where you can configure the rateshop.
- From the dropdown on the top-left, choose which service list to display the rateshop in (parcel, LTL, or both).
- Optional - Set the API Symbol field to the desired value
- Add the services you want to shop in the rateshop by moving them from Available Services to Current Services.
- Optional - Once a service is added, you can also specify extra options this service needs to use when shopping (i.e. residential delivery)
- Save the rateshop by clicking the save icon, and then close by clicking the red “X”. Your rateshop should now appear in the Rateshops window.


To edit a rateshop:
- On the Rateshops window, click the blue edit button on the right-side of the rateshop you want to modify. This will bring up a pop-up where you can configure the rateshop.
- Modify the Current/Available service lists as needed.
- Optional - Update the API Symbol field to the desired value
- Save the rateshop by clicking the save icon, and then close by clicking the red “X”. Your rateshop should now appear in the Rateshops window.
- Optional - Once a service is added, you can also specify extra options this service needs to use when shopping (i.e. residential delivery)
Using a rateshop
Once the rateshop(s) are created on the admin screen, you can start using them on the Shipping and/or Order Entry pages. Rateshops are listed at the bottom of the Services dropdown on these screens, and can be sorted via the Admin screen if needed.
When selecting a rateshop, the system will automatically shop the configured options for the rateshop on the profile anytime you press Rate (F9) or Ship (F10). Rating with the rateshop selected will return a results screen similar to the following:

You can choose the desired result from this window to accept that result and select the service listed.
Alternatively, if you press Ship with the rateshop selected, the system will choose the lowest cost option that returns from the rateshop and print the label in one transaction.
Additional considerations
Since rateshops are created at the profile level, you can re-use the same API key for multiple rateshops as long as they are on separate profiles. This allows you to create more generic API keys (i.e. "GROUND") that you can then tailor differently for each profile in the system. For example, one profile's rateshop can have UPS, FedEx and USPS, while another profile only has UPS and FedEx for the same rateshop code.
Due to legal reasons, ShipStore cannot display rateshop results from multiple carriers in a single results window if UPS is included. If UPS is included in your rateshop, the system will automatically hide the rates for all carriers that didn't return the winning service (so if FedEx Ground is the cheapest, all non-FedEx options will show $0 total). Results will still be sorted in order of cost; you just won't be able to see the rate unless you select the option manually.
